- With Joe
- Dec 11, 2024
When planning my live performance, my goal is to create a seamless and engaging experience without unnecessary pauses or interruptions. Initially, I intended to work on adapting the Logic Pro project for my song ‘Lose My Hope.’ However, since the project wasn’t downloaded, I decided to use this time to work on overall live set management instead . Here’s how I tackled the setup and some of the challenges I encountered along the way.
Combining Songs in One Project
Initially, I planned to build separate Logic Pro projects for each song, but I realised this would lead to clunky transitions. Switching between projects during a live set would mean waiting for files to load, which could kill the energy of a performance. Instead, I decided to combine all 10 songs into a single Logic project. This way, everything is pre-loaded, and I can focus on delivering a smooth performance.
Creating Modes for Instrument Assignments
Since each song requires different instrument setups, I needed a way to manage this efficiently. Logic Pro’s modes feature allows me to assign unique configurations to each song. I found a way to do it from this forum. Here’s how I set it up:
Parameter Assignment: I created a separate parameter for each mode change, assigning specific values (1 for Song 1, 2 for Song 2, etc.).
Dial Configuration: My MIDI controller’s dials send values from 1-127. I adjusted the ‘value change’ fields to only respond to values 1-10, ignoring the rest. While this works, it’s a bit sensitive and tricky to select the exact mode during a live performance.
Future Upgrades: Unfortunately, my current controller doesn’t support editing output ranges, but I’m considering upgrading to one with more customisation options.

Managing Tempo with the Timeline
Each song has its own tempo, time signature, and key, so I needed a way to ensure these settings update automatically. Here’s my solution:
Tempo Automation: I used Logic’s timeline view to set the correct tempo and time signature for each section of the project.
Markers: I placed markers in the timeline to correspond to the start of each song. Markers act like bookmarks, making navigation simple.
MIDI Assignment: I assigned a drum pad to move the playhead to specific markers, ensuring the correct tempo settings are applied for each song.
While I’m not incorporating transitions between songs yet, this setup lays the groundwork for future enhancements.

Navigating Live Loops Scenes
To produce sound, I’m using Logic’s Live Loops view. Navigating between scenes posed a unique challenge since this view lacks marker functionality. Here’s how I addressed it:
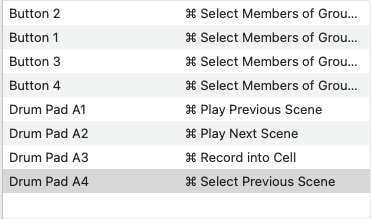
Scene Selection with Dials: I assigned two dials on my controller to ‘select previous scene’ and ‘select next scene’. Turning these dials allows me to quickly scroll through scenes.
Colour Coding: I colour-coded the cells for each song, making it visually clear where each song starts. This is particularly helpful for quick navigation.
Current Limitations: At present, I haven’t found a way to automate scene selection directly to the start of each song. It’s something I’d like to explore further.
Reflections and Next Steps
This setup marks a significant step toward creating a polished live performance. While it’s not perfect, the workflow improvements—from combining projects to using modes and markers—are making my vision more achievable. My next steps will involve refining scene navigation and experimenting with transitions between songs to enhance the flow of the set.
By documenting this process, I hope it offers insight into how a live performance setup evolves over time. If you’re working on your own, I’d love to hear about your challenges and solutions!


